High Efficiency Bike Storage Plans

tl;dr:
Tools needed:
- Drill
- Saw
- Dye
- Sandpaper
- Paint brush for dye/stain
Supplies needed:
- 2" x 8" x 16' board (or two 2" x 8" x 8' boards) ($15-300 depending on wood)
- 20 2-3" wood screws ($10)
- Three fat bike hooks ($20/ea)
- Three skinny bike hooks ($20/ea)
- Acrylic sheet
What you get:

The Long Post
I like bikes. I have a good number of bikes. When I only had one cheap commuter, it was really easy to store it - just toss it on the balcony. But then I got two, and the second was a little nicer. I decided I wanted to keep them inside, so I got one of those two bike stands.

This worked out OK, but the bikes took up a huge amount of horizontal space. Wall-mounting stuff is the best way to take advantage of storage space in an apartment or small space, and this took up way too much. I also got my hands on a bunch of extra wheelsets for increased versatility, and I needed a way to store them too.
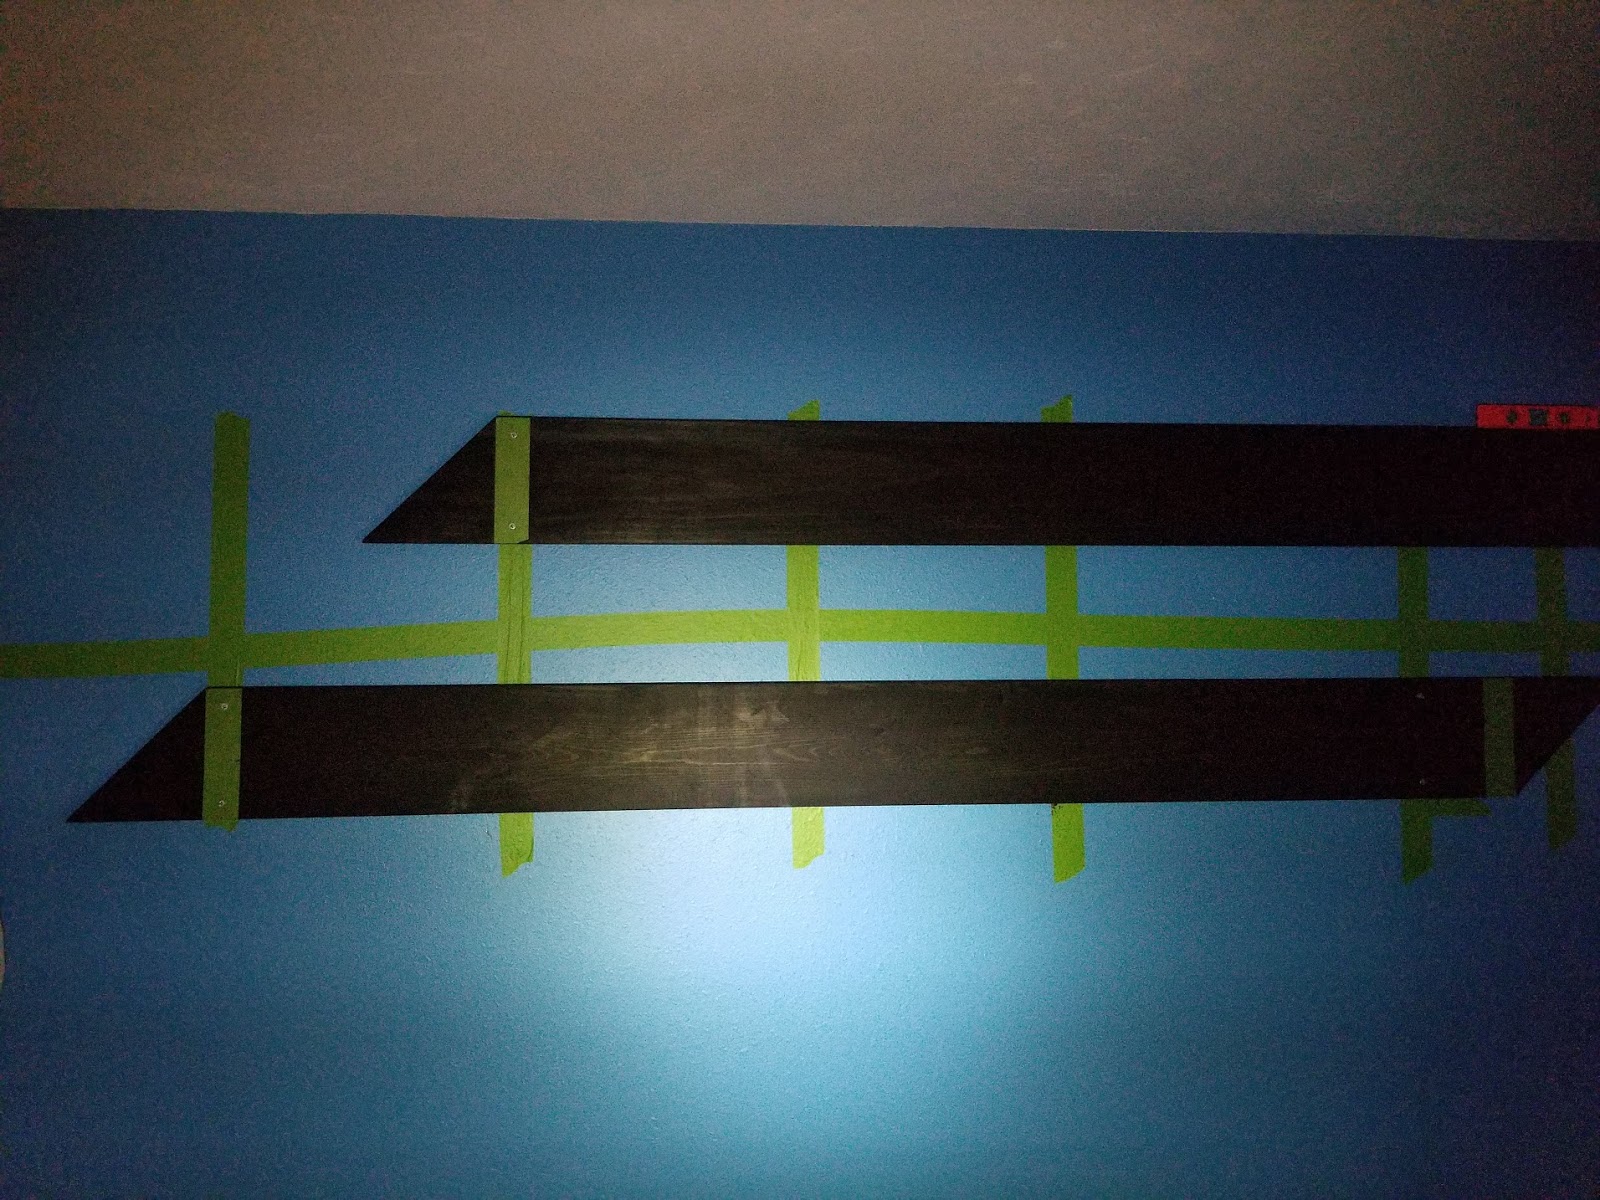
I designed a wall-mounted bike storage system, pictured below.

For my tiny studio apartment, this worked out great. Two black boards ran across the studs, and I could place the bicycle hooks exactly where I wanted them for optimal storage.
Somewhat ironically, the measurements I came up with for "optimal space" is exactly 16". This is the distance from stud-to-stud. So the boards aren't strictly necessary in my case, unless you want to mount the bike hooks somewhere other than the studs.
I've had a few folks be interested in how I designed and built this out. I lost my original design notes somewhere. I'm building this out again for my new house, but with SIX BIKE CAPACITY, so I decided to document the design process.
The Design, in Abstract
If you're sufficiently crafty, you can probably see what I've done and replicate it. It's not a difficult DIY project - indeed, I was able to do it.
The bikes are hung vertically on the wall with a hook on the front tire. The bikes are staggered vertically to reduce the chance of handlebar interference while hanging, which allows them to be stored closer together. The wheel hooks are attached to the boards to allow independence from the exact stud locations. You may choose to mount directly to the studs, if that spacing and location works out for you.
I measured enough board to mount pegboard for tools. I won't be doing that this time, because I'm going to put the tools in the Ikea Kallax square storage unit. Previously, it was doing double duty with camping gear, office supplies, etc. but in the new house, it'll be 100% bike stuff.
The bike hooks come with plastic wheel cups to guard the walls from the rear wheels. These are OK if you only ever use one bike, but I've got a bunch of bikes with different wheelbase lengths, which make the cups useless. I'm going to be mounting an acrylic glass sheet to protect the wall.
The wheels are hung from boards which are mounted directly to studs. You could mount directly to the ceiling, but I wanted a bit of extra shelf space for cute plushies.
The Room
Here's the room in the new house that will house the bikes.

It's the entryway/living room of the house. My girlfriend and I both love bikes. My brother got me into cycling, and he's moving in soon with his own fleet. So we need a lot of bike storage, and ideally, all safe and inside and efficient with bike tools and other gear.
The first thing to figure out is "How much space do I have for bikes?" We will need to allow clearance from the coat rack and the wall for easy mounting/dismounting (and use of the coat rack). We will also need to consider the size of bikes that we'll use, their handlebars, and how much overlap they allow. BMX bikes or commuters with very narrow/small handlebars allow a tighter packing than gravel bikes with wide drop bars and huge flares.
My girlfriend wants her bike next to the coat rack and on a low stagger. She's running Jones bars, which are 710mm long. They're about 28" wide with 14" on each half of the bike. 4" of clearance sounds reasonable for the coat rack, so I'll give 18" of distance between the first bike and the coat rack.

I mark where the first bike can go, roughly in the center of the green painter's tape. Painter's tape is nice because I can write on it with pencil or pen and don't have to worry about erasing or painting over it later.
This tape marks one of the boundaries for bike hooks. The next boundary will be how much clearance we need from the wall. The wall is a firm boundary, unlike coats on a rack, so I'll need to give a bit more clearance.

The tall vertical tape is what I initially placed as a boundary from the wall. That gives me about 26" of clearance from the wall. My widest handlebars are on my trail bike with 760mm (or 30"). That gives me 11" from the wall to the handlebar, which is a lot of clearance.
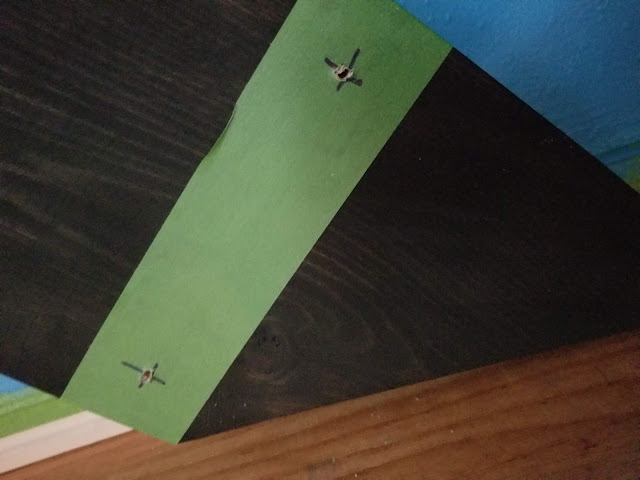
Next up, we'll figure out how much vertical space we have at our disposal. For this, I took the bike with the largest wheelbase, and held it vertically against the wall. I took a piece of tape and marked where the front wheel was when it was touching the ceiling, and when the rear wheel was touching the ground. This is the "bounding box" for how much vertical difference will be possible. Obviously you want a few inches of clearance from the ceiling, and a little bit of clearance from the ground. This process is really difficult to do with one person, and even harder to photograph, so I don't have pictures of it.

The two slightly wider bits of tape mark the top/bottom boundary where the wheels touch the ceiling/floor.

I placed the tape around the center of the wheel, favoring the measurement that would give me more clearance. It's good to err on the side of caution. The measurement here is 17" from one tape edge to the other. A stagger of about 15-16" is probably safe.
Now that we have established the room measurements with proper clearances, we can figure out exactly how much space we have. The measuring tape from one bound to the other is about 76".
The Bikes
If you're like me, you might buy and sell bikes a lot. If you do, you should design for the future and give yourself room for different sizes and styles of bikes. Designing too tightly around your current stable may make it difficult to incorporate a new bike - suppose you sell the tiny commuter and buy a burly fat bike! You may have to redesign the whole thing to fit it up there.
If you only have flat bar bikes, this is actually a bit easier. You need to have enough stagger so that the handlebars don't overlap each other, but not so much stagger that the handlebars and saddle overlap. Drop bars complicate matters a bit. While they're narrower, they are deeper and taller, which makes them take up a larger "bounding box." Drop bar bikes will require a bit more space between bikes to make it easy to mount/dismount them.
We're going to try and figure out the optimal stagger - how much vertical distance separates the top and bottom boards - as well as clearance - how much horizontal space separates two bikes on the wall. Figuring out exactly the right dimensions for stagger/distance is kind of difficult, because we can't just wall-mount them and figure out what works best. Well, you can, but that invites a lot of duplication of work, and I'm lazy.
So, to make it kinda check out, I took combinations of bikes, and stood one against the couch. I then offset another bike by 10-20" and staggered it by 12-20". I ended up getting decent results with a 14-16" stagger and a 16" distance. The stagger is well within clearance. So let's take our overall measurements and figure out how many bikes we can fit!
We'll need to keep in mind Fencepost errors while calculating this out. With 76" of space and 16" between each hook, the naive calculation of 76" / 16" gives us 4.75. We might think to round down, because we can't store 3/4 of a bike. However, what we really have is a hook at 0", 16", 32", 48", and 64", or space for five hooks.
This doesn't totally utilize the space. So I have two options here:
- Store five bikes and expand the clearance to 19" (76" / 4 sections = sections of 19" each)
- Store six bikes, expand total hook-to-hook space to 80", which reduces wall clearance by 4" to 22".
I'd like to store six bikes. I have four right now, might downsize to three. My girlfriend has only one, but may get up to three. My brother will have two bikes. So I kinda need more space. Can I make the 22" clearance work?
I determined 26" of clearance based on my widest handlebars - 760mm trail bars. My ideal drop bar width is 460mm, which are ~12" narrower, which affords an extra 6" of clearance. So I'll be fine with 4" less wall clearance as long as I put a bike with drop bars on the end. This is an acceptable compromise for me.
At this point, I put up little bits of tape indicating where the bike wheel hook would go. This is also roughly where I started documenting and taking photos of the process, so everything from now on will be in chronological order.
Stud finding
Let's find studs and identify how long the boards are going to need to be. I'm going to run a stretch of tape across the wall and mark where the studfinder finds a stud on each. Houses built in the last ~60-70 years tend to have studs placed 16" apart on center. Let's get them!

To avoid marking the walls directly, I rolled out a long piece of tape that includes all six bike hook locations. I ran the stud finder over the tape, which found a bunch of studs. Hooray!
Designing the Boards
Now, we get into the realm of ~*~ design ~*~ and aesthetics. There are a few possibilities:
- Run two identical boards for the top and bottom. This will have a lot of extra space on either side for the staggered bike that isn't represented.
- Run two boards with a stagger for the top and bottom. This is more "wood efficient" but might reduce usable space for mounting things.
 | |
|
I don't have graph paper. I do have D&D mat, so I'll use that to draw out the studs and hook locations.
This is the location of the Important Bits. Now we can figure out how large of a board we need. First up is the width of the board. We'll measure a bike hook to determine what we need here.
 | |
|
 | |
|
One design idea I have is to cut a 45 degree triangle onto each end, which would give me a parallelogram instead of a rectangle. I drew this out here with red triangles to indicate the cuts.

One thing I find particularly pleasing about this is that, if I do everything precisely enough, the line described by the hypotenuse of the triangles on either side will be continuous! The regularity and geometric continuity there is really appealing to me, actually. I've shot the idea over to my girlfriend, who has a much better design sense than I do, to see if it makes any sense. We'll see if she likes it.
The triangle would extend both sides of the board by 8" for a total increase in size of 16", or a pair of 90" boards. Since I want the angle cuts to be equal, I could potentially save total board length by making the diagonal cut to separate the boards. This would require a (180 total length - 8" saved by sharing a cut) 172" board, or ~14' 4" board. Home Depot does actually sell 16' boards, so this might make sense to do. On the other hand, a pair of 8' boards is probably a lot easier to finagle and transport in my Prius, so that may be the better choice anyway.
Lumber Dimensions
Okay, so we have a pretty good idea of what we need at this point. One thing we need to remember is that dimensional lumber lies. A board with nominal sizing of 2"x8" is actually 1.5" x 7.25". 7.25" works for the screws, which are about 5" apart, but it does leave about 1/4" of hang on the mount itself. For whatever reason, nominal length is honest. We need a 1-2" x (8" or 10" depending on overhand preferences) x 16' board to complete the project.
I log on to The Internet, go to Home Depot dot com, and start searching for appropriate boards. Framing Lumber & Studs has some boards of larger size at only $16. If I wanted to go real fancy, I could pick a hardwood board, but at prices of $60 on the low end, I think I'll have to pass.
Do I want 1" or 2" lumber? I can't remember what I got initially. 2" is going to be heavier and displace the bikes further from the wall, but offer a more secure screw mount. 1" only leaves 3/4" of board for the screws to dig into. I'll go back to the apartment and measure out exactly what I got last time I had this problem before making a decision.
Rear Wheel Protection
We don't want to mess up the wall where the rear wheel will sit. If you never change bikes out, then you can just use the cups that come with the hooks. If you change bikes regularly, then you may want to design something more flexible.
After looking at a few options, I decided to get an acrylic sheet and space it out from the wall just enough so that the bike wheels would be level. The top wheel centers will be between 14-16" staggered apart. The longest wheelbase is the trail bike, with a center-center of 47", and the shortest is the gravel bike with a wheelbase of 40". If I mount the gravel bike up top, then I will need 40" from the top hook to cover the wheel. If I mount the trail bike on the bottom, then I will need 63" from the top hook to cover the wheel (47" of wheelbase from the bottom hook + 16" stagger from the top hook"). The difference is 23" center-to-center, so I need a 24" board to cover this at maximum.
If the gravel bike is on the bottom and the trail bike is up top, though, then I need less plexiglass to cover this. The trail bike would extend 47" from the top hook, while the gravel bike would extend 16+40=56" down. The total difference center-to-center is only 9". The 2' size will more than cover what I need, and it's easily available, so let's go with that.
The distance between the first and last hook is 80". This is somewhat unfortunate. The largest 24" board I can find lengthwise is only 72" on Home Depot. Fortunately ePlastics has a 24" x 96" board. This gives me 16" extra space, or 8" per side. That's enough wiggle room that I'm pretty pleased with it.
Unfortunately, ePlastics charges $130 to ship that sheet, bringing the total cost to $200. There's an Amazon merchant with a 24x96 sheet for $132. Otherwise, Home Depot has a 48x96 sheet that would need a cut. The Amazon merchant has the best value/effort ratio.
After talking it over with the girlfriend, we're punting on this decision until we have bikes on the wall and can take better usage measurements rather than mere theory and math.
Anyway at this point I have done everything I need to purchase the supplies and plan out the stuff. I'll edit this post later with the actual build when I get started on it.
Shaping the Wood
Alright so the wood finally arrived.
When I started writing and designing the project, I realized that it would be a lot of fun until I finished it, and that I really needed to clean out my apartment and finish moving out of there. So I ordered everything I needed on Home Depot Dot Com and stuff has all finally arrived. Turns out shipping is free on two big 8' wooden boards ??
First step is planning. Second step is measuring. Third step is measuring. Fourth step is marking with pencil on the boards where the cuts need to go. Fifth step is verifying that measurement. Sixth step is making a gentle cut. Oh god it's almost time to make a cut.

Ok so made the 45 degree angle cut lines. The board isn't actually 8", which I expected, it's 7 3/8". Which is fine. So I grabbed my tape, drew a point 7 3/8" on the edge of the board, and completed the right triangle. Then I did the same on the above board and woohoo we're in business!
So one thing I'd like to get is another screw in a stud on the corner of the triangle. Not really necessary but it'd ensure that at least one screw/stud is supporting both the right and left of the bikes. I measured out to the end of the board with the tape and marking every ~16" for studs and 32" for hooks, and made the final diagonal line:
Alas! It's not going to make it. I'd need another inch or so of board length. So, instead of 5" from the hook to the angle cut begin, I'll redo the drawing/measurements with 6". This increases the overall board length 2", which isn't much. Time to redraw...

Oh hell yeah, we're in business! There's about 1 15/16" distance between lines on the triangle at the stud center, so the stud screw is going to be slightly off. Either it'll be 1" from the edge of the board (and in line with the other screws) but not an even distance to the other edge, or it will be 15/32" from both edges, but be 1/32" out of line with the other screws. After seeing how small those fractions are, and doubting my own precision, I don't care. Cool.
Repeat the process on the other board. It's going to be exactly the same, but offset by exactly 16" on the wall. If I were an extremely clever person,
Let's cut!

I clamped the boards to my super ladder transformer thing. You want the boards to be nice and stabilized. I think that ordinarily, you're supposed to clamp on both sides of the cut, but since I'm cutting pretty close to the edge, I didn't bother.

We're going to cut on the outer edge. I'm going to leave some extra room there, since I don't have a super precise setup, and I'm just going to finish that off with a Dremel sanding tool.

This is my jigsaw. It has the stock blade still. I'm sure it sucks but it works okay as far as I can tell. This isn't really the right tool for this job, I don't think, but it's the only saw I have.

I made a test cut to check out how stable the boards were and how I liked cutting in this position. I ended up moving it down a rung on the ladders to get more stability and visibility to what I was doing.

First pass on this side. I left a lot of room, so I am going to take another whack at it to try and get closer.

Ok, better! I'll smooth that out and get it 100% with a sander or something. Close enough dot jpeg.
So uhhh then I went and did the other side.
Remember how I said "Measure, measure, draw, confirm drawing, cut"? I did not actually do that. I measured, measured, drew the lines, and then cut. I did not confirm that the lines I drew actually corresponded to the plan I had.
The result is sad:

On the one hand, the cuts are kind of shitty. And on the other hand, they're not even going the right direction. Sigh.
Fortunately, Home Depot actually has a ton of this in stock, so I just placed an online order, and I can go grab it soon. I'm going to start working on the other board . . .

That's more like it. Time to sand it down and apply a first coat of stain. We want to do two things with sanding: soften those edges a bit and prepare the surface for staining. We can do both of these things with a relatively fine grit - 200 or so works out just fine. I couldn't find the tool for my dremel so I hand sanded the corners, and they worked out just great.
Before:

It's pretty rough looking and feeling. Not super pleasant.

After. Much smoother and nicer! I went over the entire plane on the stain side, and it went relatively quickly. Once you're done sanding, it's important to get all the wood dust out of there.
Staining the Wood
OK, so staining is pretty easy. We've got the stain. Then we brush it on. Wipe off excess with paper towels. Allow to dry overnight (or for an hour?? I'll let dry overnight). I'm going to set it on some cardboard so it doesn't stain anything else in the garage.
You might think "Oh I'll just open the stain and start painting it on." If you do that, this is what you get:

Instead, read the dang directions, which tell you to stir it up. Sorry. I'm not good at this. When you stir it, it looks like this:

This is why it's really important to do this stuff on test pieces first! I want a relatively dark stain here, so I'm waiting the middle option, 10 minutes. After ten minutes passed, I followed the directions on the can and wiped it off with a paper towel.
Side note: wear some nitrile or latex gloves for this. Stain has a weird way of being impossible to wash off, but also capable of getting on literally everything you touch.
 |
| two by two |
So this is what the stain looked like after 10 minutes of sitting:

Not really what I am going for. I didn't sand this test piece, so I'm going to try again. Oh! I know. I can use the board I messed up on as a big test canvas! Perfect. I'll compare the way it looks next to each other with three samples, at 5, 10, and 15 minutes, after sanding it down. Here's that shot, with 5 on top, 10 in the middle, and 15 on the bottom:

IRL the top one looks kinda faded out, with the bottom one having the richest tones. The 15 minute variant looks the best, I think:

Hell yeah. Let's get that going. I ping my girlfriend for her opinion on this, and then I go to the store. An 8' board just barely fits into my Prius, and I get it home. Measure, mark, double check, confirm design, cut, and voila - a (mostly) perfect fit!

The boards will be offset a bit - but the slopes should mostly look like they're in line with each other.
Okay, the girlfriend likes the dark stain too, awesome! Time to brush that stuff on there and wipe it down.

Not the best stain job in the world, but it'll do. I'll check up on it in the morning, and if it's looking awesome, then I'll be mounting it up tomorrow.
Mounting the Boards
I want the mounting screws to be 1" from the edge of the board, and 1" from where the triangle finishes onto the board. I put a piece of tape on the board demarcating the end of the triangle, and I measured 1" x 1" from the corner. I marked it with a sharpie (didn't have anything else around) and predrilled a hole there.
Measure, measure, verify, cut. Shortcut any part of this, and you'll probably run into a problem. I put up tape where the stud was supposed to be, but I wasn't perfectly accurate with the tape, and the stud was not in fact there. I was about a half inch off. So I redid the stud finder, found the new stud location, and predrilled a hole there. This worked. I screwed my wood screw into the board and started screwing it into the stud, so that I could verify that my plan was going to work.

With one screw in, it's relatively easy to lift the board and check that the studs are where I need them.
And they're not.
The studs are not evenly spaced - the first few are 16" apart, like they should be, but the last two are 21" and 17.5" apart. I've only got five studs to mount the boards in, and the rightmost hook is going to be basically on top of the stud. Sigh.
Well. This is salvageable. The third bike hook can mount directly to the stud, which gives it plenty of support. And there are four other studs to carry the weight.
I need to recheck my measurements on the top rack to ensure that's going to work like I want. I believe that - since the top rack is offset by ~16" from the bottom rack - that it should be fine. I placed the board on the wall, and visually verified that it'd have all the studs it'd need. Cool.

First board is mounted. Neat. The wood screws I got have such awesome penetration that I don't actually need to pre-drill holes, which is kind of amazing. Second board initial mounting went pretty smoothly:

I tested the angle with a straightedge, and I nailed it here! I test the boards for appropriate height - do bike wheels have enough clearance from the ceiling and floor? They do. Neat. Alright, I'm out of daylight, so I'll have to finish this tomorrow. Going to drill the rest of the stud screws, and then measure/measure/verify/drill the bike hooks in.

Measure, measure, verify, cut. Shortcut any part of this, and you'll probably run into a problem. I put up tape where the stud was supposed to be, but I wasn't perfectly accurate with the tape, and the stud was not in fact there. I was about a half inch off. So I redid the stud finder, found the new stud location, and predrilled a hole there. This worked. I screwed my wood screw into the board and started screwing it into the stud, so that I could verify that my plan was going to work.

With one screw in, it's relatively easy to lift the board and check that the studs are where I need them.
And they're not.
The studs are not evenly spaced - the first few are 16" apart, like they should be, but the last two are 21" and 17.5" apart. I've only got five studs to mount the boards in, and the rightmost hook is going to be basically on top of the stud. Sigh.
Well. This is salvageable. The third bike hook can mount directly to the stud, which gives it plenty of support. And there are four other studs to carry the weight.
I need to recheck my measurements on the top rack to ensure that's going to work like I want. I believe that - since the top rack is offset by ~16" from the bottom rack - that it should be fine. I placed the board on the wall, and visually verified that it'd have all the studs it'd need. Cool.

First board is mounted. Neat. The wood screws I got have such awesome penetration that I don't actually need to pre-drill holes, which is kind of amazing. Second board initial mounting went pretty smoothly:
I tested the angle with a straightedge, and I nailed it here! I test the boards for appropriate height - do bike wheels have enough clearance from the ceiling and floor? They do. Neat. Alright, I'm out of daylight, so I'll have to finish this tomorrow. Going to drill the rest of the stud screws, and then measure/measure/verify/drill the bike hooks in.
 |
| So close! |
Mounting Hooks
This one is actually reasonably straightforward. I want 6" between the "flat edge" of the triangle and the hook. That's 5" from the stud. I put a tape on, drill the screw in, level it, and voila:
 |
| gf's surly wednesday <3 |
Okay, let's do the next one over. There's a bit of a moment of truth here - are the boards at the right height? I think I measured it appropriately. But we'll see.

Second hook goes up, try to mount the trail bike. Doesn't fit. The hook system requires the bike tire to go over the hook by a decent amount, and the extra clearance I gave isn't sufficient. I can get the gravel bike up there OK, but it's a tight fit:
The trail bike on the lower hook is a perfect fit - the wheel is in contact with the wall and the floor.
Hmmm. This is a snag. I probably need to bring the boards closer together by a bit - maybe a half inch or an inch up for the bottom board, and an inch or two for the top board. That's going to ruin the diagonal line, which I actually nailed with this placement. Maaaaan.
Anyway the end result looks pretty awesome and comfortably fits six bikes:


Comments
Post a Comment